In this blog, we are implementing a basic mutation observer example that will observe the DOM changes and fire the events. So first, we have to understand what a mutation observer is. and how to use mutation observer in javascript
What Is a Mutation Obsever ?
The MutationObserver interface offers the potential to observe for adjustments being made to the DOM tree. it’s far designed as a replacement for the older Mutation events function, which turned into a part of the DOM3 activities specification.
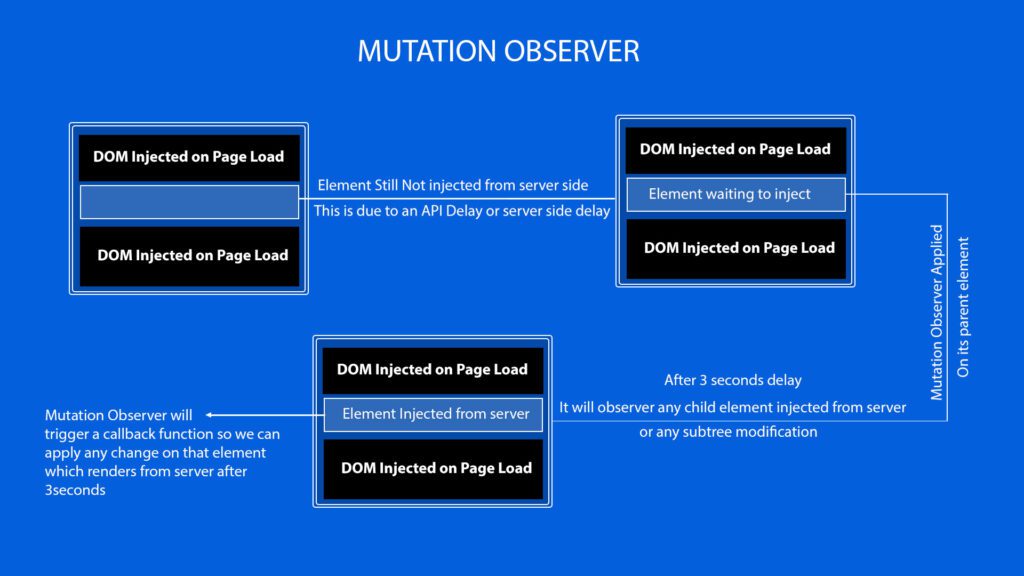
Let us take an example in real life sanario, suppose some data in the website rendering after 3 seconds on delay, it could be rendering by sever, so on page load we are not able to get data in our dom because of this server side delay, and we are not able to apply javascript, or target server side DOM element by javascript because it is not present in DOM at the time of first page load, So to observer that DOM changes and apply javascript at that time when server side DOM element got injected in HTML page we use mutation observer .
let get more clear with the help of below diagram for Mutation Observer

Simple Mutation Observer Method
Lets start with simple mutation observer method and understand step by step
// Select the node that will be observed for mutations
const targetNode = document.getElementById("some-id");
In the above code we have to select an element from DOM on which we want to observe change or in which we have to observer the data coming from API.
// Options for the observer (which mutations to observe)
const config = { attributes: true, childList: true, subtree: true };
In config we will define if we want to observe a subtree modification like child element injected , and any attribute modification on div , or and child list injected like ul li
// Callback function to execute when mutations are observed
const callback = (mutationList, observer) => {
  for (const mutation of mutationList) {
    if (mutation.type === "childList") {
      console.log("A child node has been added or removed.");
    } else if (mutation.type === "attributes") {
      console.log(`The ${mutation.attributeName} attribute was modified.`);
    }
  }
};

// Create an observer instance linked to the callback function
const observer = new MutationObserver(callback);

// Start observing the target node for configured mutations
observer.observe(targetNode, config);
The above one is the callback function which will check all the mutaions list defind and observe change in them, you can see the condition mutation.type === “childList” that will check if any child element is added from server on by delay of if mutation.type === “attributes” it will check for any attribute modification.
targetNode is the target element pass in method obsever and config is the const which will pass what wen need to observe in mutations const config = { attributes: true, childList: true, subtree: true };
Now let us go through a simple example of the above use case, where after 5 seconds we will insert an element into the DOM that acts as an API and make some changes to that element through mutation observer.
let create and html structure first as below
HTML
       <section>
        <h3>Element Already present in DOM</h3>
        <div class="data">this is container data</div>
       </section>
       <section id="server-data">
        <h3>Element to be injected after some time</h3>

       </section>
       <section>
        <h3>Element Already present in DOM</h3>
        <div class="data">this is container data</div>
       </section>
Your can see there are three section in above code , in second section we have added an id with name server-data
in which we are going to inject a div with class data after some delay so that it can be observe by mutation observer
So now we will write a javascript code to observe that element with id=”server-data”.
        // Select the node that will be observed for mutations
        const targetNode = document.getElementById('server-data')

        // Options for the observer (which mutations to observe)
        const config = { attributes: true, childList: true, subtree: true }

        // Callback function to execute when mutations are observed
        const callback = (mutationList, observer) => {
          for (const mutation of mutationList) {
            if (mutation.type === 'childList') {
              console.log('A child node has been added or removed.')
            //added class on element when data div injected from server
              targetNode.classList.add("element-injected")
            } else if (mutation.type === 'attributes') {
              console.log(
                `The ${mutation.attributeName} attribute was modified.`,
              )
            }
          }
        }

        // Create an observer instance linked to the callback function
        const observer = new MutationObserver(callback)
In above code we have defined const targetNode = document.getElementById(“server-data”); which is an ID it will observe server-data div so if any change modified inside that div willbe observe by mutation observer , now lwt us go thrugh the working demo of above code which will chean the backgournd coloue of the mutated element in DOM
DEMO
Wait for 4 seconds
Element Already present in DOM
Element to be injected after some time
Element Already present in DOM
In above demo you will see after some time when data got injected from server the background colour and text is changed, because through mutation observer we have added a class when any subtree modification happens on the targeted mutation div.
DEMO FILE
Download the demo file and impliment in your code


